3 ways to help the author that COST YOU ABSOLUTE ZERO ! see the bottom of the page.
laying the simplest garden path and planting up a shady area
Stage 5 of backyard garden project
I will explain below how to lay out the simplest garden path, a paths for dummies, a can't go wrong sort of path. The area under the large Acacia karoo is shady. Out on its edges, near the concrete pit, there is some sun at midday, and along the fence at its northern edge, there is sun most of the day in winter. The paths would attempt to put a line around these areas to enclose the different types of planting for different light conditions, as well as provide access. Below is a view of what the section of garden looked like before planting out. The small shrub in the middle is my furry friend’s favorite decorating point. The Salvia that you can hardly see, which grows next to it, seems sensitive to this and struggles on the edge of life, with mostly dead and withered branches, but has made a huge recovery since planting the bed.
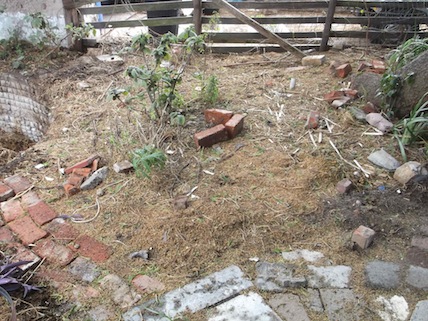
the shady garden before laying the path and planting with indigenous plants
But before doing any planting I first needed to lay the garden path for easy working access that I had plotted on my plan. I laid them slightly differently to the design in the plan, as the best solution actually came to me on the ground, as I prepared to work. I used a double line of bricks. It is just wide enough for comfortable sitting and secure walking, without taking too much room, and it lays fast compared to broken bricks.
First of all I laid out a line of bricks to one side of where the path would be. The path will skirt the tree and the densest shade. I adjust the bricks by eye until the curve was right. It is not a circle and I couldn't use measuring equipment to get it right.
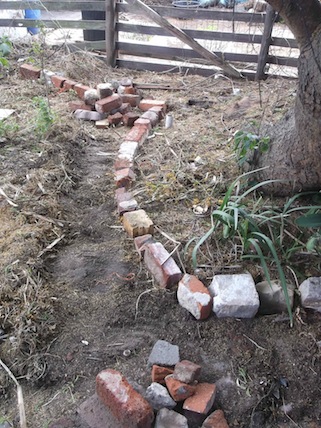
outlining the garden path and clearing the earth
Below you can see how I laid the garden path after this, first scraping the earth flat with a trowel, and then laying the bricks nexto the line I had made, using up the bricks in the line as I went. I covered the laid bricks with the sand I had removed to lay the path, and brushed it into the cracks between the bricks with a broom, and shored them up at the sides. This stabilizes them nicely.

laying the garden path
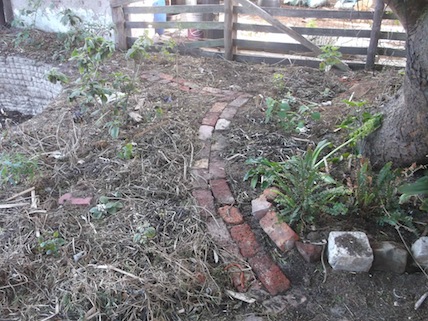
Finally the garden path was finished, and I could start planting. You can see the path curves around the deepest shade at the bole of the tree, a huge umbrella shaped African thorn tree Acacia karoo and then veers to the left along the fence where there is sunny spot. The A. karoo is usually not so big, but this is the result of 15 years of vermicomposting at its base. The path is a working path, laid out with ease of access to all areas of planting, keeping in mind limitations like my arms length, secure walking surface while carrying heavy watering cans and comfortable place for squatting on the earth while weeding.
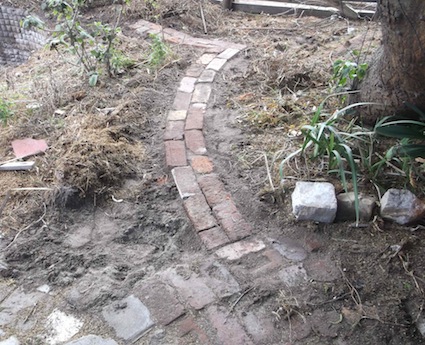
the completed garden path
On the day of planting I returned to my garden plan, and got the right plants lined up ready for planting out. However, the first object was to deal with the plants which had to be moved around. The sword fern was suffering, the irises were not flourishing, and the philodendrons had been moved to take the place of the aloes in the big pot.
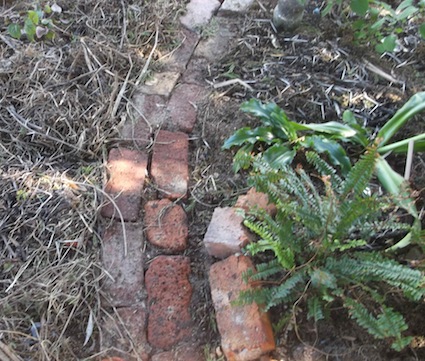
a suffering sword fern
The sword fern was growing where it catches the sun in the afternoon. Combined this with the earth it was planted in being choked with dead morning glory vines that keep the area too well drained, and the fern was going brown. I’ve replanted this area now with sunloving irises which I removed from the dark area to which the fern is going, and they are also doing better and expand the already existing iris bed which adjoins them, providing for visual continuity. Some of the irises also went to fill the gap where the philodendrons had been and neaten up the line of the iris bed up to the massive tree root which edges it. In the picture at the top of the page you can see the fern, replanted after laying the path, with a berm supported by bricks to make sure the moisture penetrates this oily soil. A few days after being transplanted it began to put out new fronds.
After transplanting those plants which needed to be moved, I began to plant out the shade loving indigenous plants from Granny’s Green nursery at Grand West Casino, which I’d got for such an amazing bargain. Eucomis, Velthemia, Plectranthus went in the shady areas and Pelargoniums in the sun along the fence.
Next I filled in with smaller plants. Under the tree, even shade loving plants tend to grow very slowly, and weeds (just pioneer plants with amazing tenacity and flexibility as to their needs) tend to choke them out. In addition to mulch, I need a shade loving ground cover to minimize having earth that is bare in the shade under the tree between larger plants, and in the big pots around the large philodendron stems. These were taken from the small bed you see here.
Before planting I put down a layer of vermicompost, and after planting I mulched with dried grass and then sprinkled my dog protection mulch which is not very effective, except that he now treads cautiously in these areas. It consists of sweepings from the garage's iron roof, on which thorn branches had been laid to keep it cool.
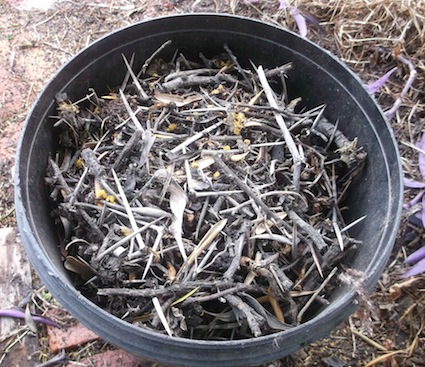
a mulch of thorny sweepings
Finally after an exhausting day’s work the path had been laid, and the bed planted, fertilized, mulched with dry grass and tree sweepings and watered thoroughly. A couple of stepping stones provided access to larger areas.
Below is the shady section after planting. It looks a little messy, but it is the dried grass that looks so messy. I like it because it keeps the earth shaded without coating it too densely, and it is readily available whenever I clear an area. The grass seeds which will sprout again soon in the rainy season, would not be removed by removing the dried plants. The damage has been done, and I’m going to have to weed like crazy for a season. That is fine because I did nothing for eight years while I was studying.
the garden path and the shade loving plants
------
home page for more green links
------
links to other gardening topics
------
link to stage 1 of the backyard garden project
------
link to the previous stage 4 of the backyard garden project
------
stage 6 backyard garden project; bed preparation and a simple straight path
THREE WAYS TO REWARD MY WORK THAT WILL COST YOU NOTHING AT ALL. Dear Reader, in this age of AI created content, please support my human-made content. It requires a lot of research and garden experimentation, aka blood sweat and tears, the last ten years. You pay me back by signing up for the free newsletter (once a month, no spamming) at the top of the lefthand column or below. Please use the response form at the bottom of the page to respond directly to its content. If you find what I give you useful I would appreciate a share to the social media platform of your choice, the buttons are on the extreme right of your screen, Just click them !
Restore Nature Newsletter
I've been writing for four years now and I would love to hear from you
Please let me know if you have any questions, comments or stories to share on gardening, permaculture, regenerative agriculture, food forests, natural gardening, do nothing gardening, observations about pests and diseases, foraging, dealing with and using weeds constructively, composting and going offgrid.

SEARCH

Order the Kindle E-book for the SPECIAL PRICE of only
Prices valid till 30.09.2023
"How to start a profitable worm business on a shoestring budget
Order a printed copy from "Amazon" at the SPECIAL PRICE of only
or a digital version from the "Kindle" store at the SPECIAL PRICE of only
Prices valid till 30.09.2023

")